Mill Circle
Use the Circle data block to mill circles.
To create a Mill Circle data block:
-
From the Input screen, select the Part Programming softkey or icon.
-
Select the Insert Block Before softkey.
-
From the New Block screen, select the Milling softkey.
-
From the New Block (Milling) screen, select Circle. Mill Circle screen opens.
-
Enter geometry data into the appropriate fields. Field definitions can be found by following the links below.
-
Enter block operation data into the appropriate tabs and fields. Field definitions can be found by following the links below. Also see Operation Data for more information.
The Field Name Glossary contains definitions of all WinMax fields. The fields listed below appear on the Mill Circle screen. Fields displayed on screen may vary according to machine type, configuration, parameter settings, and/or settings in other fields.
|
|
|||
|
|
|||
|
|
|||
|
|
|||
|
|
|||
|
|
|||
|
|
|
Mill Circle Example
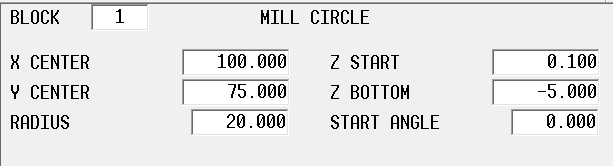
The sample data in the fields above create the following circle.
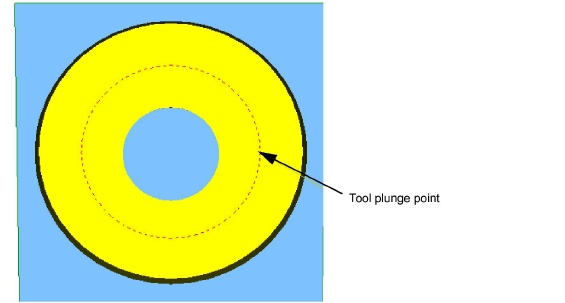
In this example, Milling Type is ON. Machine movement occurs as follows:
-
Tool moves at Rapid Traverse rate in Z to the plane.
-
Table moves at Rapid Traverse rate in XY to the Start Angle position at the 3 o’clock position.
-
Tool moves at Rapid Traverse rate to Z Start.
-
Tool moves at Plunge Feed rate to Z Bottom.
-
When the tool reaches Z Bottom, machining continues at Mill Feed with the center of the tool along the contour, moving clockwise around the circle (direction set in Program Parameters) until cutting is complete.
-
Tool retracts at Rapid Traverse rate to the plane.
|
|
Cutter compensation, set in the Milling Type field, determines the compensation applied to the tool path. See Cutter Compensation (preliminary) for more information. |
|
|
Pecking is the use of multiple cutting passes to optimize tool operation. See Pecking for more information. |
|
|
To use pocketing with Mill Circle, the UltiPockets option must be installed. See UltiPockets for more information. |
|
|
Follow this link to hurco.com/connect to view Mill Circle video demonstrations: Mill Circle video demonstrations on hurco.com/connect Scroll down on the page and select the Intro 1 or Intro 2 Mill Circle video to download. Internet connection is required. |
|
|
For Rotary Circle, see Rotary Circle - Universal in the Rotary manual. |