M
—initiates a tool change at the M06 code when set to Yes. If set to No, tool changes are initiated by a T code.
—the current relative axes location or distance-to-go (DTG).
—the physical orientation of the spindle, relative to the table surface. The possible machine classes are vertical, horizontal, and universal.
—specifies if the axis coordinates are machine relative.
—total number of machine hours expended to date.
—currently selected tool station in the magazine. Increment or decrement using + or - softkeys.
—indicates Locked or Unlocked Position. Locked is required for ATC to begin.
-
—indicates the current magazine position: In Pos (1) or In Pos (2).
-
In Pos (1) is required for ATC Status Home.
-
In Pos (2) is active when magazine is rotating and not in position.
—indicates Reference Pos when the ATC calibration sensor is detected.
—the current magazine position (note that this may not be the tool number).
Maintain Operation Level 1 Order
—in Tool Change Optimization, when set to Yes, all Level 1 operations (typically these are the roughing operations) are performed in block sequence, including any specified tool changes. When set to No, all Level 1 operations are performed in tool change sequence. Default is No.
|
|
For Holes, the first hole operation is treated as a Level 1 operation and will be executed when other Level 1 operations are executed, based on the Maintain Operation order. The other hole operations will always follow the first hole operation. If the hole operation should not be started until a previous block has been finished, then be sure to disable Tool Change Optimization prior to hole operation. |

Maintain Operation Level 2 Order
—in Tool Change Optimization, when set to Yes, all Level 2 operations (typically these are the finishing operations) are performed in block sequence, including any specified tool changes. When set to No, all Level 2 operations are performed in tool change sequence. Default is No.
|
|
The Maintain Operation Level 2 Order parameter does not apply to holes operations. |

—specify if you will manually size the border, in Stock Geometry (field available only when Manual Stock Sizing is set to NO). If Yes, specify Border Size.
—the jog feedrate, entered on Manual screen.
—the feedrate of a linear axis move.
—the spindle speed, entered on Manual screen.
—specify if the stock dimensions will be manually set in the Stock Geometry screen. When set to No, the software automatically sizes and positions the stock. To calculate the automatic sizing, WinMax takes the diameter of the largest tool in the program and adds 7/10ths of that size to the stock diameter X and Y fields (with a minimum addition of .05). When this field is set to Yes, stock dimensions must be entered manually.
—the size of the text character including ascenders and descenders:
-
Body Only—defines the height of the body of the lettering. Ascenders and descenders are calculated automatically.
-
Descended—defines the height of the body and descenders (the portion of some characters that extends below the baseline) of the lettering. Ascenders are calculated automatically.
-
Ascended—defines the height of the body and ascenders (the portion of some characters that extends above the x-height) of the lettering. Descenders are calculated automatically.
-
Full Font—defines the height of the body, ascenders, and descenders of the lettering. No part of the lettering is calculated automatically.
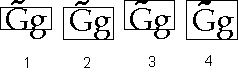
|
1. Body Only |
|
2. Descended |
|
|
3. Ascended |
|
|
4. Full font |
—the material to be used, if specified (optional). This field appears as read-only in Program Properties; however, the material can be changed with the Change Material softkey. See Tool and Material Database for more information.
—select either Ultimax Classic or Standard Calculator interface to be used when editing data fields:
-
Ultimax Classic—select operation (=,-,*,/), then number, and then Enter. For example, if the number 5 is displayed as a value, pressing “+” and the number 3 will change the value to 8.
-
Standard Calculator—select number, then operation (=,-,*,/), then Enter. For example, if the number 5 is displayed as a value, pressing 3 and “+” will change the value to 8.
—maximum distance at which chaining of selected entities (line and radius, for example) will occur. This setting is used with the 3D DXF/Solid Model Import option.
—the maximum depth of cut.
—the maximum feedrate for contouring. Field appears in Standard motion only.
—the maximum diameter difference for a tool in a program to be considered a match to the same tool in the Tool and Material Database. This field is only available when the Enable Automatic Matching setting is enabled.
—maximum amount of time before FTP connection is dropped.
—appears when either Profile Left, Profile Right, Profile Inside, or Profile Outside Milling Type is selected. The value is the distance between the programmed contour or tool path and the tool center during the first pass. The number entered here must be manually calculated. Refer to Maximum Offset for details.
—the maximum acceptable speed for the spindle.
—the maximum acceptable speed for a tool in the spindle.
—the maximum rapid traverse rate.
—the deviation (difference) between the minimum and maximum probe readings. If the deviation is greater than the Max Spread value, an error message appears.
Max Tool Cutting Time Exceeded
—specify how to proceed when the maximum cutting time has been exceeded:
-
Display Warning Message—specify if a warning message should display when a tool’s maximum cutting time is exceeded.
-
Mark Tool Defective—if set to Yes, the program run aborts when attempting to change to a tool that has exceeded its maximum cutting time. The program switches to the sister tool instead, when available.
—the M Code representing a machine function in a Machine Function block. Type the code into the field or select from the M code list.
—the feed rate to use when measuring the part feature.
—defines how objects can be measured:
-
Screen—used to make a 2D measurement in either XY, XZ, or YZ view.
-
World—used to make 3D measurements in Isometric view.
|
|
Snap to Object must be enabled if Measure Space is set to World. |

This setting is used with the 3D DXF/Solid Model Import option.
—the milling type. Select Conventional or Climb milling for canned milling cycles (e.g., frame, circle, and ellipse) and for contours (e.g., line, arc).
-
The default is Climb.
-
The choices are Conventional or Climb.
—the type of cutting operation. Identifies whether the system should automatically compensate for the diameter of the tool when determining tool path; select the cutter compensation or pocket type with the softkeys or drop-down list box. Refer to Cutter Compensation (preliminary) for more information.
The values in the Milling Type field vary according to the block type:
|
Mill Contour |
Mill Circle, Frame, Ellipse, Slot, Polygon |
Mill Face |
Mill Triangle, |
|
On |
On |
X Unidirectional |
Inside |
|
Left |
Inside |
X Bidirectional |
Inside 2 Passes |
|
Right |
Outside |
Y Unidirectional |
Pocket Out/In |
|
Profile Left |
Profile Inside (Inside Tangent in Ellipse data blocks) |
Y Bidirectional |
Pocket Out/In 2 Pass |
|
Profile Right |
Profile Outside (Outside Tangent in Ellipse data blocks) |
|
Pocket In/Out |
|
Pocket Boundary |
Pocket Boundary |
|
Pocket In/Out 2 Pass |
|
Pocket Island |
Pocket Island |
|
|
For information about Milling Type in Mill Face, see Conversational Programming, Mill Face.
For information about Milling type in Mill Triangle, Diamond, and Hexagon, see Conversational Programming, Insert Pockets.
—the X-Y feedrate. The value initially displayed has been calculated by the control and can be retained or changed to a different value. See Getting Started with WinMax Mill for more information.
—the minimum cutter overlap used for cusp height (percent of cutter diameter) with a flat end mill. The Use Cusp Height field must be set to YES.
—the length (in number of characters) when Assure Minimum Length field is set to Yes. This field only appears when Assure Minimum Length is Yes.
—the working envelope the probe tip uses to search for part features in Z machine coordinates.
|
|
When the cursor is in any of these fields, the RESET PROBE WORK REGION TO MAXIMUM (F4) and STORE MACHINE POSITION (F7) softkeys become active.
|

—the distance below probe stylus or beam that the Z axis is allowed to travel; determines Min Z Position. Absolute Tool Length mode only.
Minus/Plus A/B/C Direction Travel Limit
—the maximum and minimum travel limits for the A, B, and C axes in System Configuration.
Minus/Plus X/Y/Z Direction Travel Limit
—the maximum and minimum travel limits for the X, Y and Z axes in System Configuration.
—available when a ball end mill is used as the tool for 3D Mold or Swept Surface milling data blocks. Enables the tool to go below the lowest z point (centerline z) by the radius of the tool, forming a cusp. If Min Z is disabled, the tool does not go below centerline z. For 3D Mold, this field displays when a TYPE of “ABOUT X” and a CUT DIRECTION of “NORMAL” are selected. For Swept Surface this field displays when INDIVIDUAL PROFILES is set to “NO”.
—the lowest position that Z will be allowed to travel during the probe cycle. This parameter sets up a safety zone for each tool. This value must be low enough to allow proper deflection of the probe. This is especially important when checking diameter as the tool must drop down next to the probe stylus.
—the variable number to be monitored.
indicates whether or not the table will move to the right/front of the machine when the operator is changing a tool. If this field is set to Yes when a part program block calls for a tool change, the table will move out of the way.
|
|
Move to Safe Pos During TC is applicable on all VM and VMX series machines (excluding VMXSR models). For all other series (VMXSR, DCX, VC, VCX, BX, HMX), this setting is visible but does not modify machine behavior. |
Move to Safety Pos Manual Mode ATC
—Manual Mode ATC operations are performed at Safety Position when enabled.
|
|
Move to Safety Pos Manual Mode ATC is applicable on all VM and VMX series machines (excluding VMXSR models). For all other series (VMXSR, DCX, VC, VCX, BX, HMX), this setting is visible but does not modify machine behavior. |
—specifies if multiple tools are to be probed. Yes will include current tool in multi-tool probe cycle.