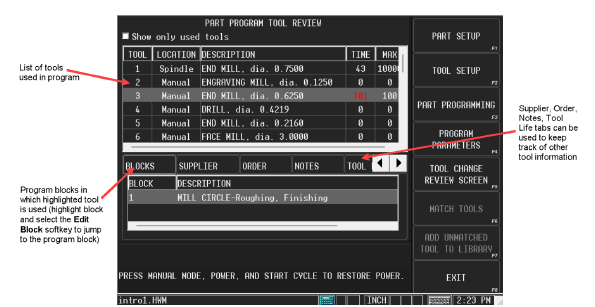
Part Program Tool Review
Use the PART PROGRAM TOOL REVIEW softkey on the Program Review screen to review the tools used in a specific part program. This screen lists all tools used in a program, and the program block where they are used. The location column indicates if the tool is in Manual, Auto, or Spindle.
|
|
Start typing a tool number to jump to that tool in the review list. The Jump to tool pop-up box opens; select OK to go to that tool in the list. |

Tool information can be entered into the Supplier, Order, Notes and Tool Life tabs at the bottom of the Part Program Review screen.
|
|
Tool notes can be entered and viewed on the Notes tab in the Part Program Tool Review screen and the Advanced Tool Settings screen. Notes can also be viewed in the Select Tool screen (accessed with the Select Tool from List softkey when entering a tool in a program block). |

|
|
The Supplier, Order, Notes and Tool Life tabs are only available with the Tool & Material Library option. |

|
|
If Tool Life Monitoring is enabled under User Preferences (Part and Tool Settings), the Tool Life tab displays on the Part Program Tool Review screen. This tab allows the user to set the total cutting time the tool has been in the rotating spindle as well as the tool’s maximum allowable cutting time. It also enables the user to specify a sister tool to be used if the primary tool exceeds its maximum cutting time. 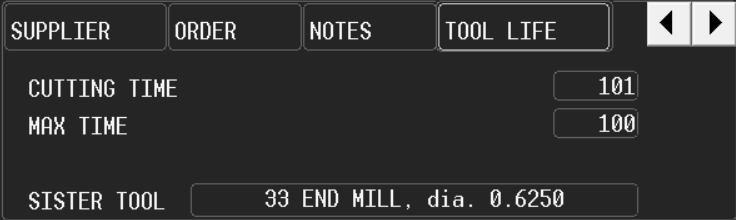 |

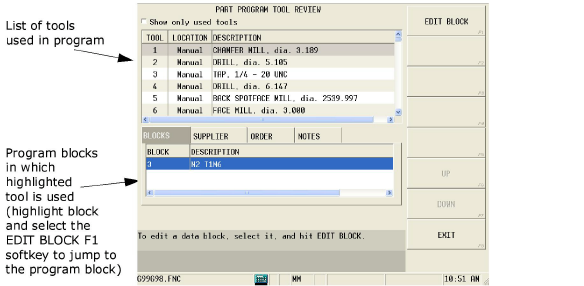
Part Program Tool Review for NC Programs
Part Program Tool Review in NC programming scans the current NC program for T codes to determine the tools used in the program. T codes are ignored if they are inside a comment (surrounded by parentheses) or if they are an argument in a macro call (preceded by a G65).
Tools are listed by number. When a tool is selected (highlighted), the Block list will display the number and NC text of all blocks that contain the T code for a tool change to the selected tool, as shown below:
|
|
Jump to a program block by highlighting the block and selecting the Edit Block softkey. |

If a tool in the current NC program is not defined in Tool Setup, it appears in the Tool Review list as an unknown tool with a diameter of 0 and an unknown location. This is shown below.

An undefined tool can be added to the NC tool setup by selecting the tool in the list, selecting the Tool Setup softkey, and selecting a type or entering data for the new tool. The tool can also be quickly added as an unknown tool with a diameter of 0 by selecting the Add As Manual Tool softkey.
Part Program Tool Review Softkeys
Softkeys perform the following functions:
-
Part Setup—access Part Setup screen. See Part Setup for more information.
-
Tool Setup—access Tool Setup. See Tool Setup for more information.
-
Part Programming—access and create data blocks of a part program. The current program's data blocks appear on screen when this softkey is used. Delete, add, edit, and navigate through the data blocks. The NC editor is displayed for NC programs. See Conversational Part Programming for more information.
-
Program Parameters—accesses the Program Parameters screen to specify data common to all program data blocks. See Program Parameters for more information.
-
Tool Change Review Screen—access the Tool Change Review screen to see all tool changes in the part program. Available with the Tool Change Optimization option. See Tool Change Optimization in the Options manual for more information.
-
Match Tools—access tool matching results. See Tool Matching for more information.
-
Add As Manual Tool—adds the highlighted unmatched tool as a Manual tool in the Tool & Material Library and assigns it the next available tool number.
Tool Matching
When a new program is loaded and the Tool & Material Library option is enabled:
|
|
The diameter is set in the Tool Matching: Maximum Diameter Difference field in Part and Tool Settings. |

-
The new program’s tools are compared to the tools in the Tool & Material Library to identify a match by tool type and diameter, and flutes.
-
If only one tool match is found, the program will use that tool number, including the Zero Calibration, from the Tool & Material Library. Note that Feed and Speed data will not be replaced in the program.
-
If more than one match exists, WinMax then looks at tool number. If it finds the same tool number, type, and diameter, it will match the tool.
-
If there are no matches, tools are either loaded into the Tool & Material Library as Manual, or users can select from a list of tools in the Tool & Material Library that are similar to the unmatched tool. The AUTOMATICALLY LOAD UNMATCHED TOOLS AS MANUAL field in Part and Tool Settings controls this:
-
When the field is set to YES, any unmatched tools from the new part program will be added to the Tool & Material Library and will be assigned to the first available tool number. For example, a new program is loaded with tool #12 as a 0.375 inch end mill. If tool #12 in the Tool & Material Library is not a 0.375 inch end mill and no other tool in the Tool & Material Library is a 0.375 inch end mill, then this tool will be added to the Tool & Material Library as a Manual tool and will be assigned the first available tool number.
-
When the field is set to NO, a prompt to match tools appears. Answer YES to the prompt to review the unmatched tools.
-
Tools that are unmatched are displayed in Tool Matching Results.
Tool Matching Results
When tools from the part program cannot find a matching tool in the Tool & Material Library, these unmatched tools are listed in the Tool Matching Results screen, accessed with the MATCH TOOLS softkey from the Tool Review screen. Unmatched tools from the current part program are listed in the “Tools to be matched” section; for imported programs, the Import Number (No.) column contains the tool number saved in the original program. When each unmatched tool is highlighted, a list of tools from the Tool & Material Library with the same tool type are listed in the lower, “Closest matches” section. Tools of the same type are listed in order of closest to furthest diameter difference from the highlighted tool.
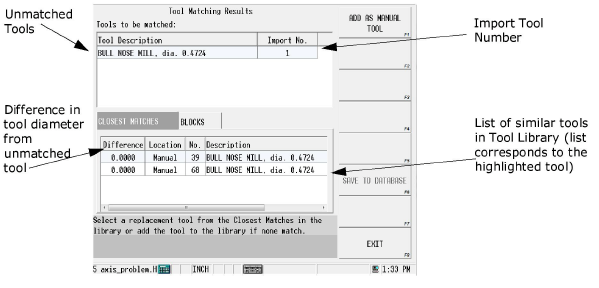
The Choose As Replacement softkey appears when you select a tool from the Closest matches list. Use this softkey to replace an unmatched tool with the selected tool from the Tool & Material Library.
If there is not a match in “Closest matches,” use the Add As Manual Tool softkey to add the tool to the Tool & Material Library.
The Save To Database softkey appears when you select an unmatched tool from the list. Select the softkey to save the tool to the Tool and Material Database.
|
|
Saving a tool to the Tool and Material Database will not match a tool with an existing tool in the Tool & Material Library. The program will still consider the tool unmatched and will not run until a match is selected or a new tool is added to the Tool & Material Library. |
