Extended Shop Floor (ESF) User Guide
The Extended Shop Floor option or ESF (formerly UltiMonitor) is available on web-connected Hurco machines. It allows owners/operators to remotely access a wealth of information about the activity and productivity of their Hurco machines on demand. It shows the current status of their machines through screenshots, DRO readouts and machine-event listings. ESF even allows them to subscribe to notifications of machine events.
This guide describes the process of establishing a new shop in ESF and transferring machines to that shop. It also details ESF’s extensive features and functionality.
|
Using the Productivity - Day and Productivity - Week Screens |
|
|
Creating a New Shop
When installing or servicing a machine with the ESF option, a service tech contacts Hurco to establish a new shop. This requires the shop owner’s first and last name, address, email and the shop name.
A shop-owner email can only be associated with a single shop in ESF. Once a shop is established, one or more machines can be transferred to it for use with ESF.
|
|
Only authorized Hurco personnel can create shops in ESF. Talk to a service tech or contact Hurco support to request this. Owners/Operators will not be able to proceed with setup and use of ESF until this has been done. |
Transferring a Machine
“Transferring” a machine (assigning it to the correct shop) requires the machine to be internet connected. The process is completed using the following basic steps:
-
The Hurco service tech initiates the transfer following shop creation in ESF.
-
The service tech begins the transfer process at the machine on the shop floor.
-
The shop owner completes the process using a few simple email steps.
-
Once a machine has been successfully transferred to the shop, it appears on the Shop Dashboard screen.

|
|
|
|
Only authorized Hurco personnel can transfer a machine in ESF. Talk to a service tech or contact Hurco support to request this. Owners/Operators will not be able to proceed with setup and use of ESF until this has been done for at least one machine. |
Using the Sidebar Menu
The sidebar menu is the means of navigating between the basic screens of Extended Shop Floor: Dashboard, Productivity - Day, Productivity - Week, Subscriptions, Program Packages and Shop Settings. Select the menu option to display the desired ESF page.
|
|
To minimize the ESF sidebar menu, click the triple line at the bottom. This reduces the menu width, maximizing the ESF display area to the right.
|
Using the Dashboard
After a successful login, the Extended Shop Floor Dashboard screen displays with a card for each machine under the current shop.
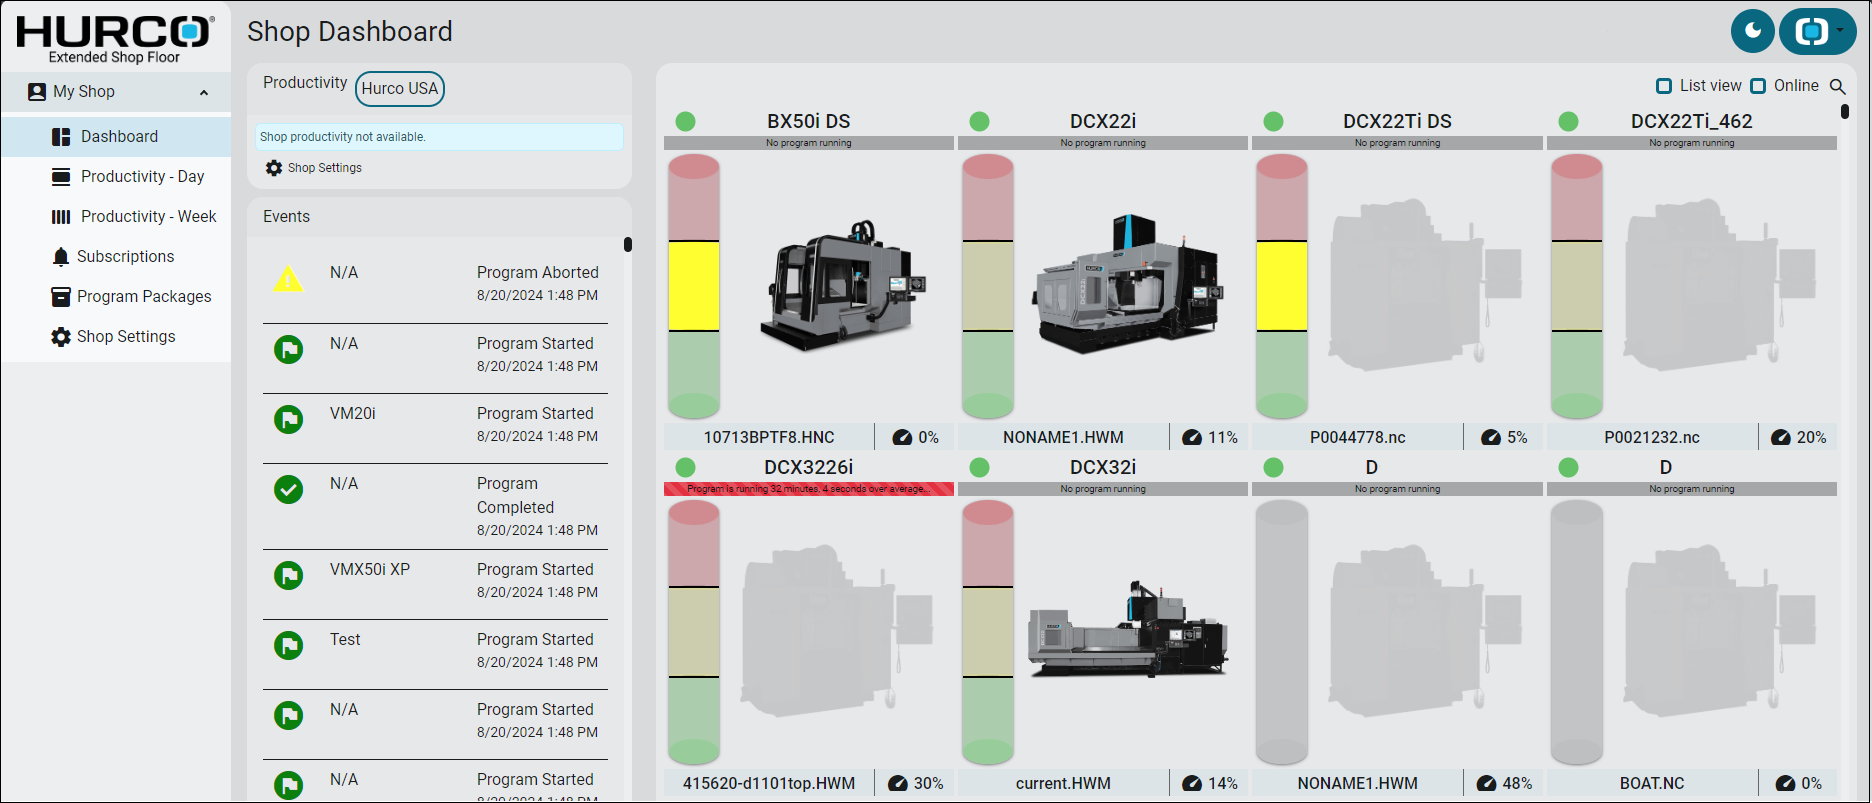
In the upper right of the Shop Dashboard screen are three options to filter/modify the manner in which the machines below are displayed: List view, Online and  (search).
-
List view - Modifies the shop machines displayed below from the standard "card" view (as shown above) to a line-by-line list. This accommodates more machine information within the space. Select the desired machine to display its Machine Dashboard.
-
Online - Filters information displayed below to show only machines connected to the internet.
-
Search - Reveals a search field. Enter search characters in this field to filter machines displayed to show only those with a matching string in their machine name.
If the standard "card" view is used, the screen shows a card for each machine within the current shop. When online and transferred to the shop, the machine has a green circle in the left corner of its heading. If offline, the circle is red. The card also includes the machine name, an image of the machine (if model specified), the name of the program currently running on the machine (if applicable) and its present status, a work efficiency percentage and (if the machine and WinMax version support this) stack-light status. Selecting a machine navigates the user to that machine’s dashboard.

To the right of the main ESF menu is a consolidated chronological list of all events occurring on the machines under this shop. To view the events for an individual machine, either click on the machine card to the right or select an event for this machine from the list.
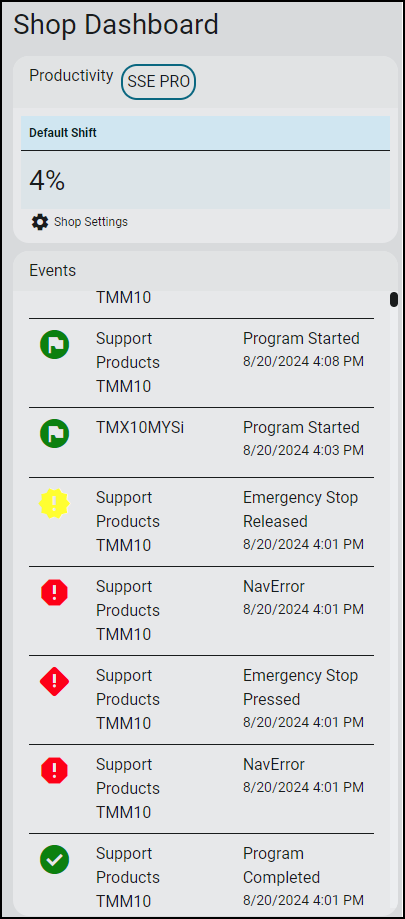
Each listed event is displayed with a colored symbol indicating the type of event:
 |
Emergency stop pressed |
 |
NavError file generated |
 |
Program error |
 |
Emergency stop released |
 |
Program aborted |
 |
Program completed |
 |
Program started |
Using the Machine Dashboard
The Machine Dashboard view provides a snapshot of the machine at a given point in time. This includes a tile for the machine, current screen-image views and video snapshot (if equipped), productivity timeline and machine-operation basics (program runs, software details, machine events and digital read-out).
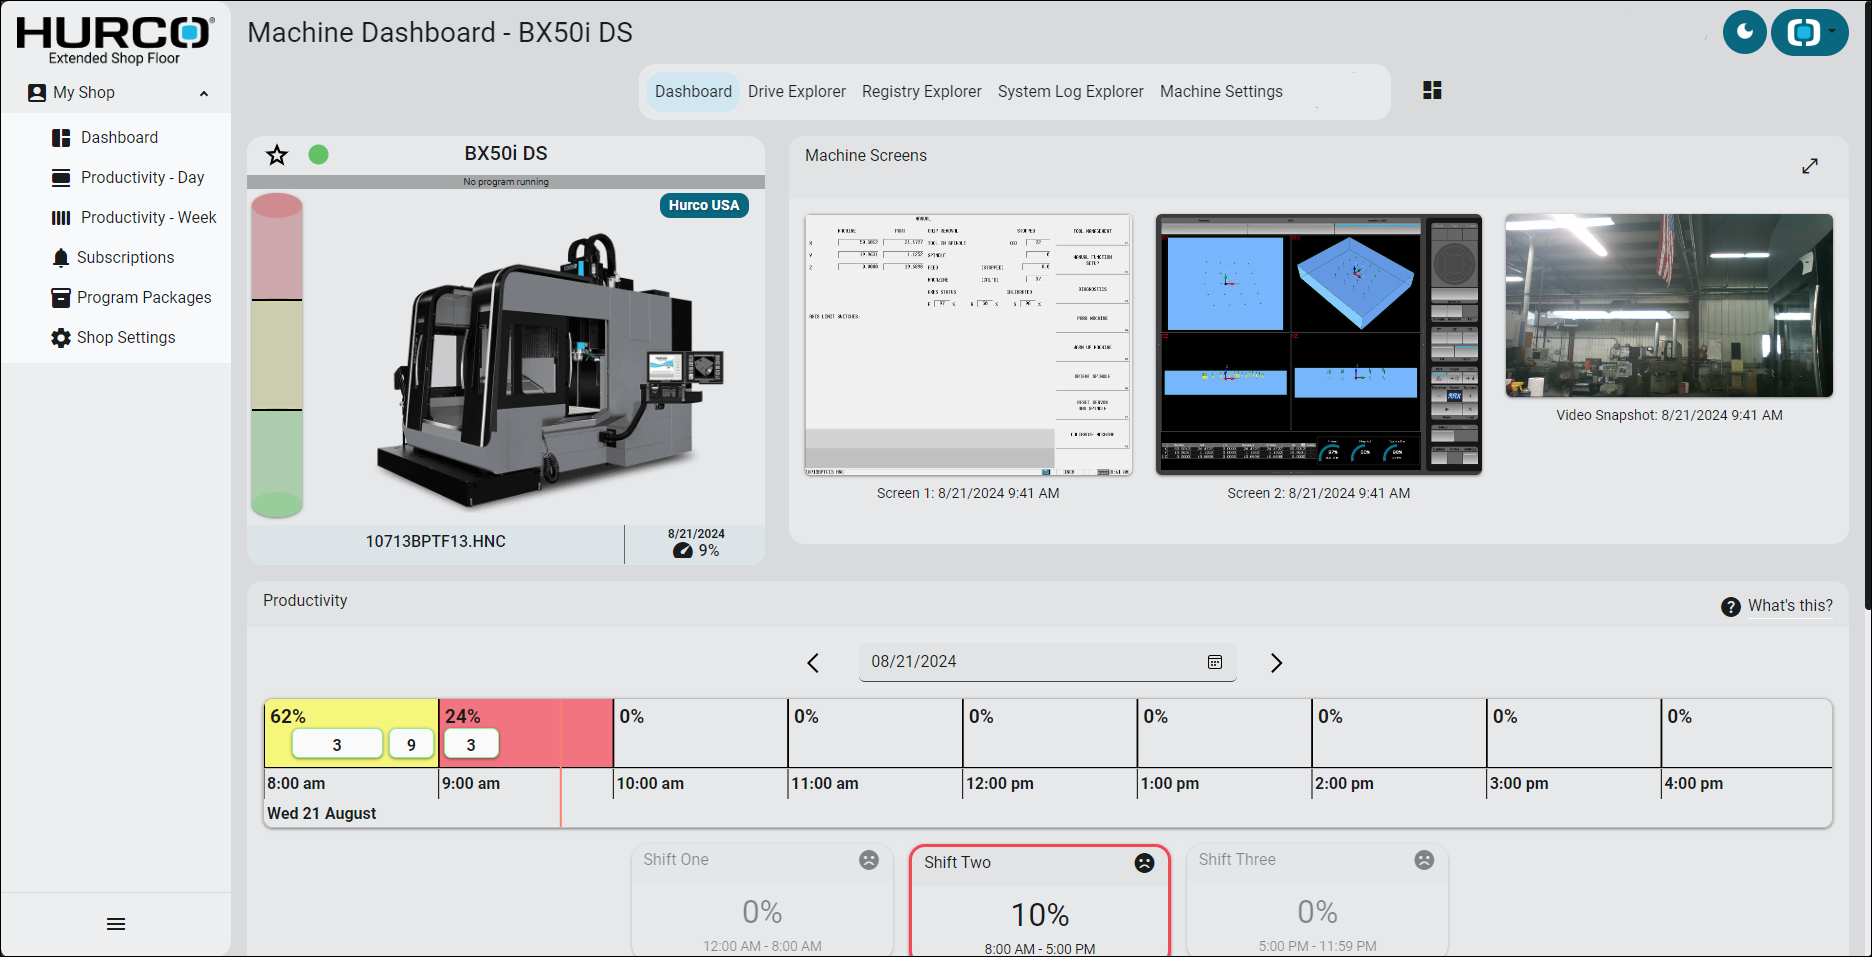
Machine Card
The card under Machine Dashboard contains the same information described above under the ESF Dashboard screen.
Machine Screens
This section of the Machine Dashboard screen shows recent screen shots from the machine. These refresh on a regular basis. If the machine has dual screens, two screenshots display. If the machine is equipped with a webcam, a video snapshot also displays, refreshing at the same interval.
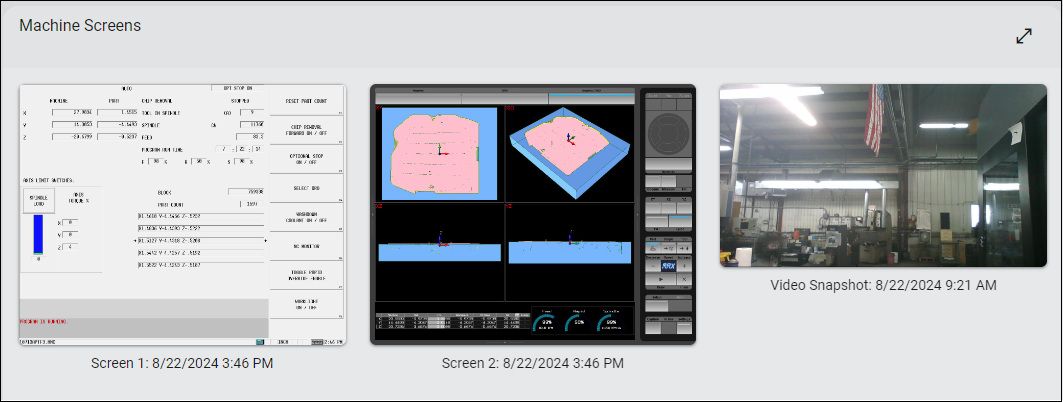
Productivity
The Productivity component of the Machine Dashboard enables owners/operators to gauge a machine’s efficiency for each defined shop shift. (i.e., whether the machine is running programs and cutting parts). An efficiency value is applied to each overall shift and to each hour within the shift. Colors indicate the efficiency of the machine:
|
Low efficiency |
|
|
Moderate efficiency |
|
|
High efficiency |
Under the Machine Dashboard, productivity information displays in the form of a timeline. This timeline shows which program is running (or has run) and hour-by-hour shop shift efficiency values. Hover over single programs to view program start and end times.
If programs run in a close time span, they cluster together and appear as a white block on the timeline. The number on the block indicates how many programs it includes. Single program runs appear green. Hover over the timeline and zoom in with the mouse wheel to reveal more granular detail.


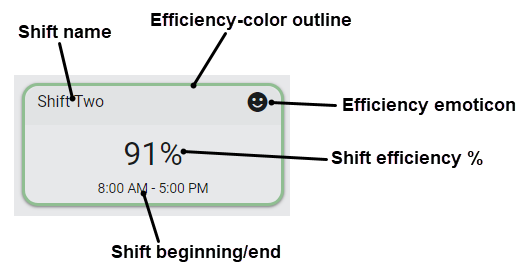
An overall efficiency value for each shift displays in a box below the timeline. The custom name for the shift is shown as well as the shift’s start and end times. Its rated efficiency is illustrated in multiple ways:
-
An efficiency percentage showing the proportion of shift time the machine was in use;
-
An outline in one of the three efficiency colors;
-
A happy, neutral or sad emoticon matching the efficiency color.
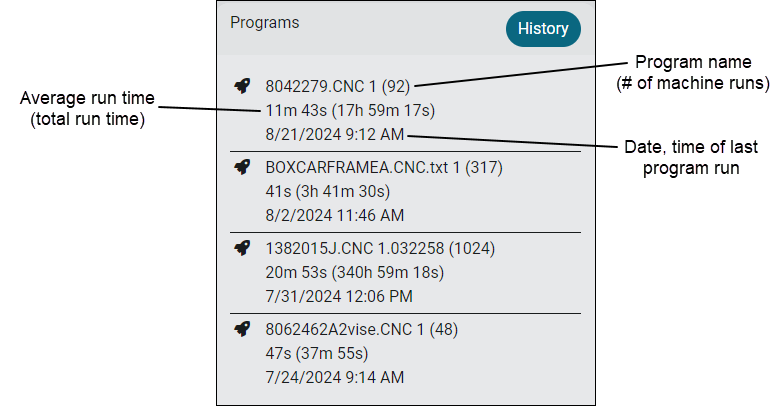
Programs
The Programs section lists the programs most recently run on the machine.
Clicking the History softkey reveals more detail about programs historically run on the machine:
-
The name of each program run on the machine;
-
The program’s average and aggregate runtime;
-
The number of parts produced by the program;
-
The number of program runs used to produce the parts.

|
|
In the row below the headings, enter characters in the Name column (if desired) to filter the information displayed by matching program names. |
Once Program History is displayed, click on an individual program to display additional detail: date and time of each program run, program runtime and number of parts created.
Software
The Software section of the Machine Dashboard screen shows the current versions of software installed on the machine, as well as the following additional details:
|
Category |
Description |
|---|---|
|
Display Units |
Whether the selected units of measurement are metric or imperial. |
|
Machine Hours |
Total running hours on the machine. |
|
Spindle Hours |
Total running hours on the spindle. |
|
S2 Spindle Hours |
Total running hours on the secondary spindle (where applicable). |

Selecting the History softkey displays the complete Software Version History for the machine, listing each software version installed, including the date and time when this occurred. Software with upgrades shows multiple entries in the Software Version History table.
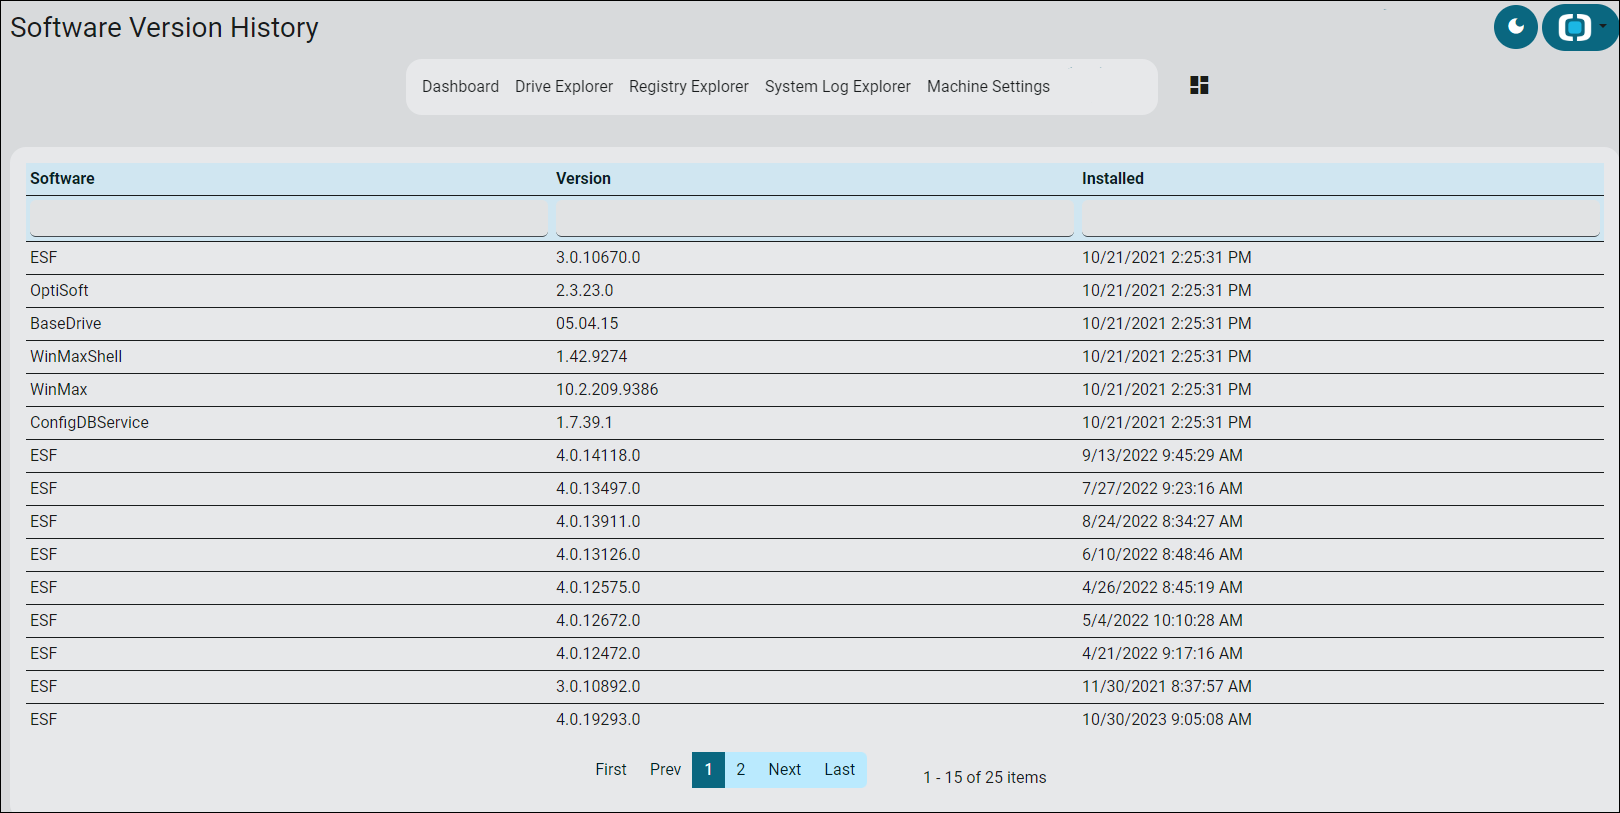
Select a column heading to sort the list by the values in that column. Or enter characters in the first row of a column to find any entries with a matching character string.
Machine Events
The Machine Events section of the Machines screen displays the last few significant events impacting the machine. The following are considered machine events:
-
NavErrors;
-
EStop pressed;
-
EStop released;
-
Program aborted;
-
Program completed;
-
Program started;
-
Program error.

Clicking the Log softkey displays the complete machine Event Log. This includes some of the following information for each event (depending on the event type):
-
NavError;
-
Program block number;
-
Program name;
-
Program runtime (hours/minutes/seconds);
-
Auto run type;
-
Part count.
|
|
Machines running an ESF version prior to 4.0 will not be able to display this additional event-log detail. Consult the bottom portion of the right pane of Hurco’s shell for identification of the ESF version running on a machine. |
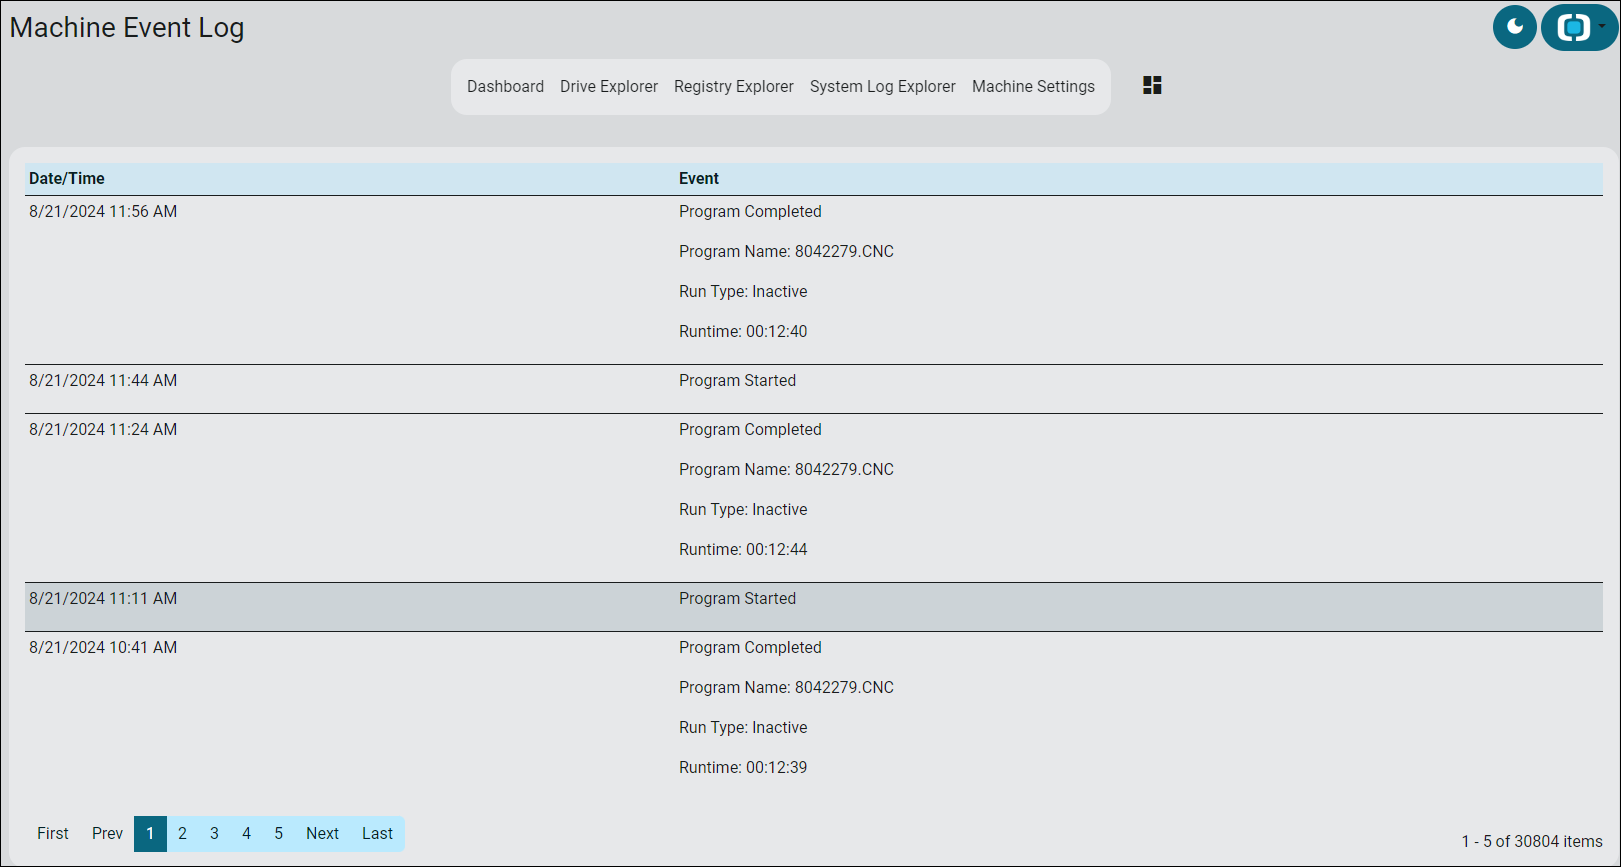
Use the navigation buttons at the bottom of the screen to move between pages.
|
|
Event Log records are commonly extensive. |
|
|
DRO
The DRO section shows the current digital read-out information from the machine. Displayed information is described below.
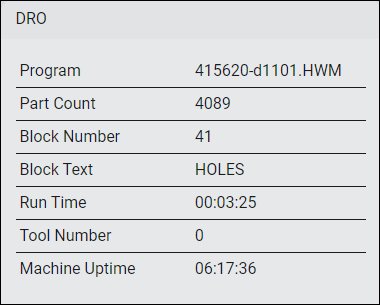
|
Category |
Description |
|---|---|
|
Program |
Program currently running or most recently running on the machine. |
|
Part Count |
Machine internal part count. This counter is auto-incremented on program completion or can be incremented by command. |
|
Block Number |
Current executing program block number. |
|
Block Text |
Type of program block listed above. |
|
Run Time |
Run time of the program listed above (hh:mm:ss). |
|
Tool Number |
Number of tool currently in the spindle. |
|
Machine Uptime |
Total time using this program to cut parts on the machine (hh:mm:ss). |
Using the Machine Dashboard - Screenshots View
The Machine Screens view shows what appears on the machine’s screen(s). These are larger versions of the screen shots on the Machine Dashboard view. If the machine has a dual-screen control, two screens are shown. The screen stills on the Machine Screens view refresh frequently.
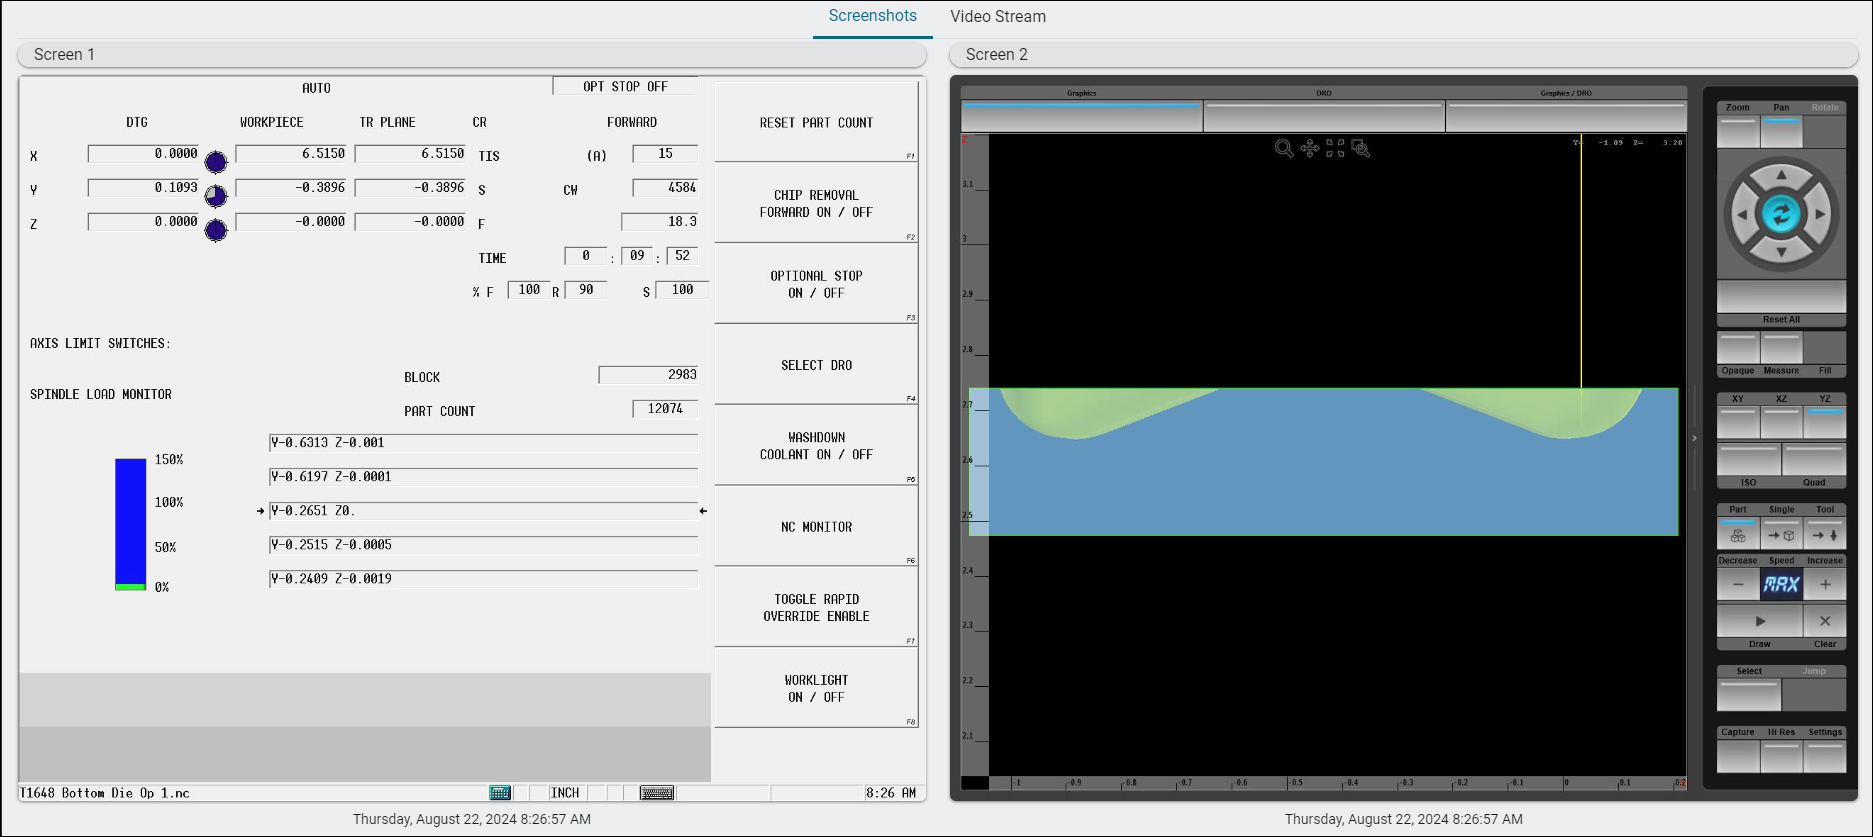
Using the Machine Dashboard - Video Stream View
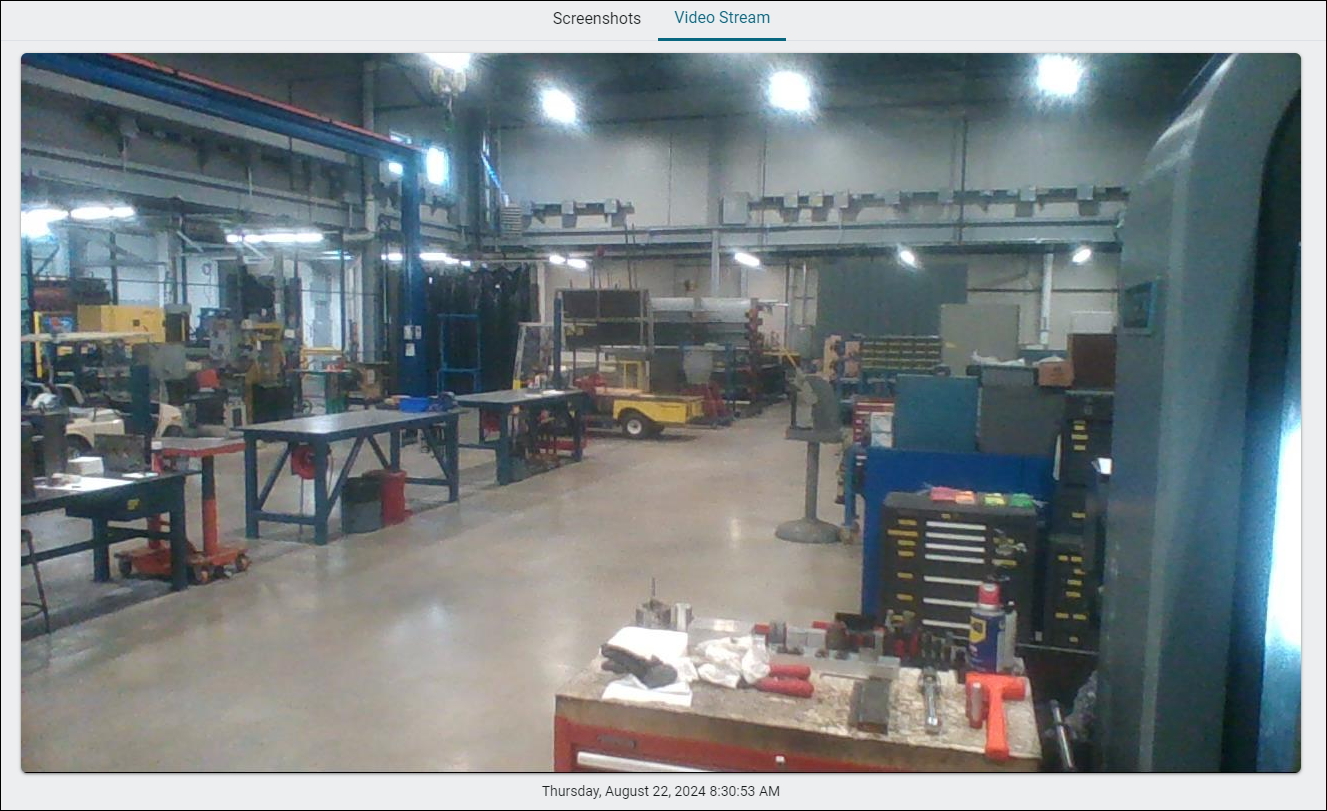
If the machine is equipped with a webcam, ESF takes a still shot from it at the same interval as the screen shots. This is a larger version of the snapshot from the Dashboard view. If the machine does not have a webcam, a message indicates no machine video stream is available.
Using the Machine Dashboard - Drive Explorer View
The Drive Explorer view allows the owner/operator to see the drives on the machine remotely and perform actions with files on those drives. Use the options under the Drive Explorer view to upload files to the drives or download them from the drives through ESF.

Follow these steps to upload/download files to/from the Hurco machine using Drive Explorer:
-
Click on the drive to which the file(s) will be uploaded or from which the file(s) will be downloaded under the Drive Explorer heading on the left.
This expands the drive to display its folders below. The same folders are shown under the File Explorer heading on the right along with individual files. The files have checkboxes in the leftmost column, as they can be selected to download.
-
If uploading a file to the machine:
-
Using the Drive Explorer and/or the File Explorer section of the screen, navigate to the location where the file should be uploaded. Select the desired folder.
-
Select the Upload softkey in the upper right.
-
Select the Choose file softkey and navigate to the file to upload in the Open dialog.
-
Double-click on the desired file or select it and click Open in the bottom right.
-
Select the Upload button in the Upload File to Machine dialog. This places the file in the specified location.
-
-
If downloading a file from the machine:
-
Using the Drive Explorer or the File Explorer section of the screen, navigate to the location of the file to be downloaded.
-
Click to place a check mark to the left of each file to download.
-
|
|
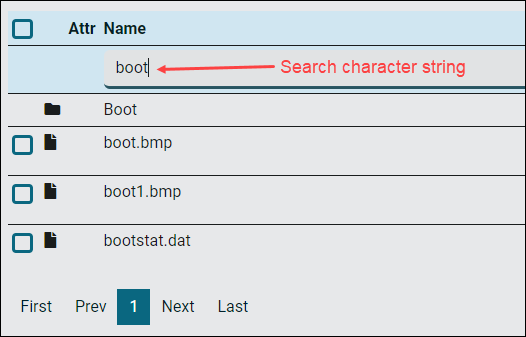
Select as many files for download as desired. To clear all file selections, click the Clear softkey in the File Explorer heading bar. Folder or file lists can be filtered by a character string entered in the top row of the Name column: |
|
c. Select the Download softkey in the upper right. |
This downloads the file(s) to the Downloads directory of the laptop/desktop. The file(s) is (are) saved to a compressed folder with a .zip extension.
|
|
The Download softkey is not enabled until at least one file is selected. |
Using the Machine Dashboard - Registry Explorer View
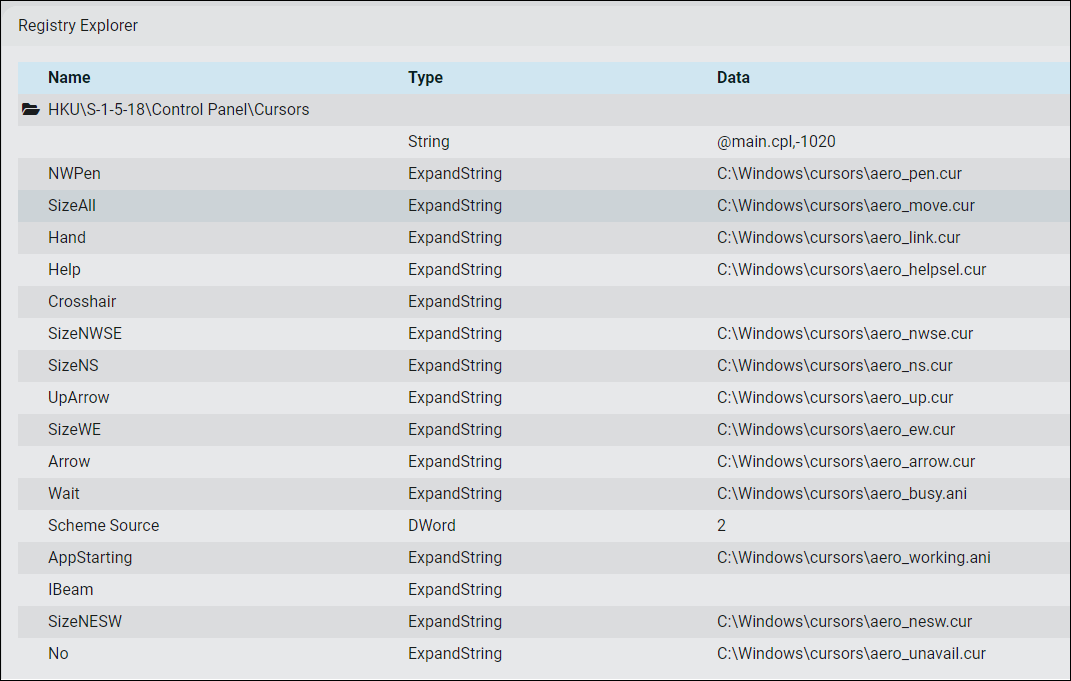
The Registry Explorer allows the owner/operator to view the machine’s registry directories, where its configuration settings are organized and stored. Select the desired folder(s) to display its(their) contents. Use standard Windows methods to move up or down in the directory structure (opening or closing folders). All information in Registry Explorer is view-only.
Using the Machine Dashboard - System Log Explorer View
The System Log Explorer view displays informational and error messages generated by the machine’s Windows operating system in various categories. These are logged by date and time along with the message source and type. They are view-only.
System-log messages are organized in different categories. The categories displayed vary according to the machine and the types of messages it generates.
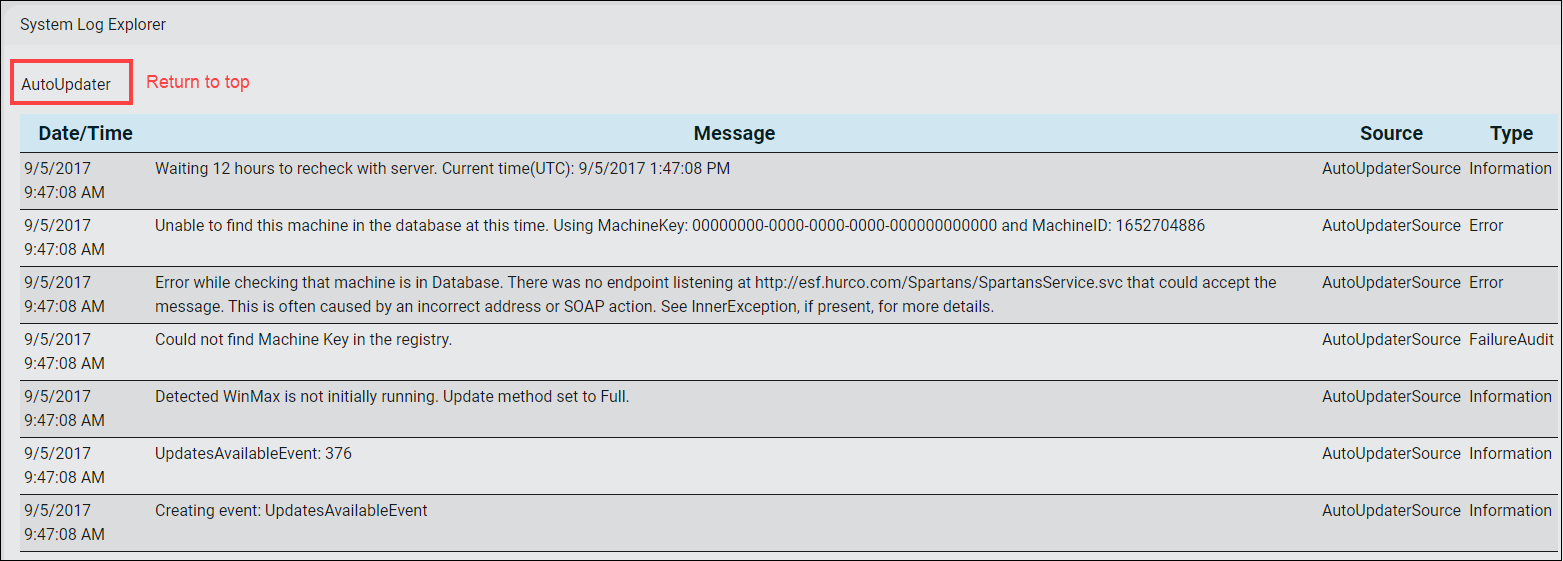
Select the desired category to expand the individual log-message detail below it.
Use the navigation options at the bottom of the message detail to move forward or backward through the screens. When finished, click the event log category below the "System Log Explorer" heading to return to the top.
Using the Machine Dashboard - Machine Settings View
The Machine Settings view contains identifying details about the machine. Some of these details populate automatically during machine transfer, whereas others are entered/selected by the owner/operator or Hurco service tech.
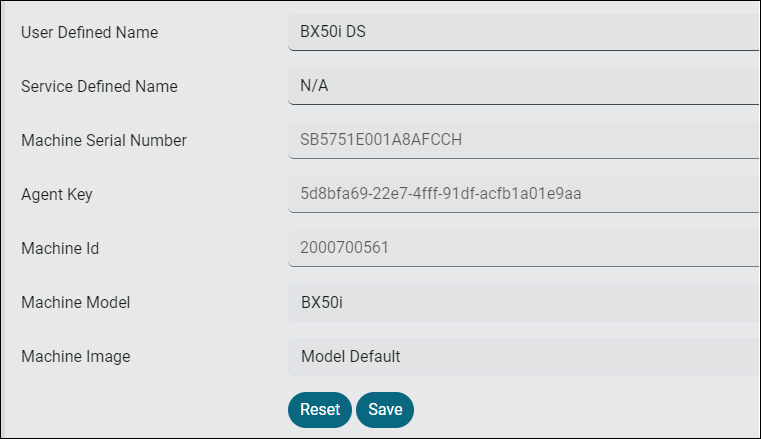
To modify the machine information shown, simply click in the field and make desired changes. Not all information presented here can be changed. In some fields the value must be chosen from the available list. Click the Save softkey to save any changes. The Reset softkey reverts all Machine Settings to the last saved value.
|
Field |
Description |
|---|---|
|
User Defined Name |
Machine name as specified by the owner/operator. |
|
Service Defined Name |
Machine name as specified by Hurco Service. |
|
Machine Serial Number |
Number assigned to the machine by Hurco manufacturing and linked to the machine through OptiClient. The Machine Serial Number is entered directly into ESF during the machine transfer process. It cannot be changed. |
|
Agent Key |
Internal machine identifier (auto populates during machine transfer). |
|
Machine Id |
Internal machine identifier (auto populates during machine transfer). |
|
Machine Model |
Hurco machine model number. |
|
Machine Image |
Graphic image of the machine. If set to "Model Default," the image is of the machine model selected above. |
Using the Productivity - Day and Productivity - Week Screens
The Productivity - Day and Productivity - Week options in the sidebar menu allow the owner/operator to display daily or weekly productivity trends (by shift) for each machine under the current shop. To access shop productivity data, select Productivity - Day or Productivity - Week in the sidebar menu.


Use the date arrows above the productivity detail to increment or decrement the date range shown.
|
|
When weekly shop productivity is displayed, only a single date is shown between the date arrows. However, the productivity information below is for the entire week displayed in the blue block at the top of the workspace. |
Each combination of machine and date is assigned an efficiency grade according to the percentage of the shift/date the machine was active cutting parts. As on the Machine Dashboard, the following color scale is used:
|
Low efficiency |
|
|
Moderate efficiency |
|
|
High efficiency |
Selecting a machine in the Productivity - Week detail displays a shift breakdown for the week:

If there is more than a single screen of machines listed, use the navigation options below the productivity detail to advance to additional screens.
Maintaining Subscriptions
The Subscriptions option in ESF allows owners/operators to receive regular emails summarizing productivity data and/or event data from their machine(s). It enables them to specify the type of information and the specific machine(s) to include as well as set up multiple subscription requests serving different needs.
Establishing a New Subscription Request
Owners/Operators can use ESF to create as many customized subscription requests as necessary. Follow these steps to establish a new subscription:
-
Select Subscriptions in the sidebar menu.
The Subscriptions screen displays the list of active subscriptions on the left and detail of the currently selected subscription on the right.
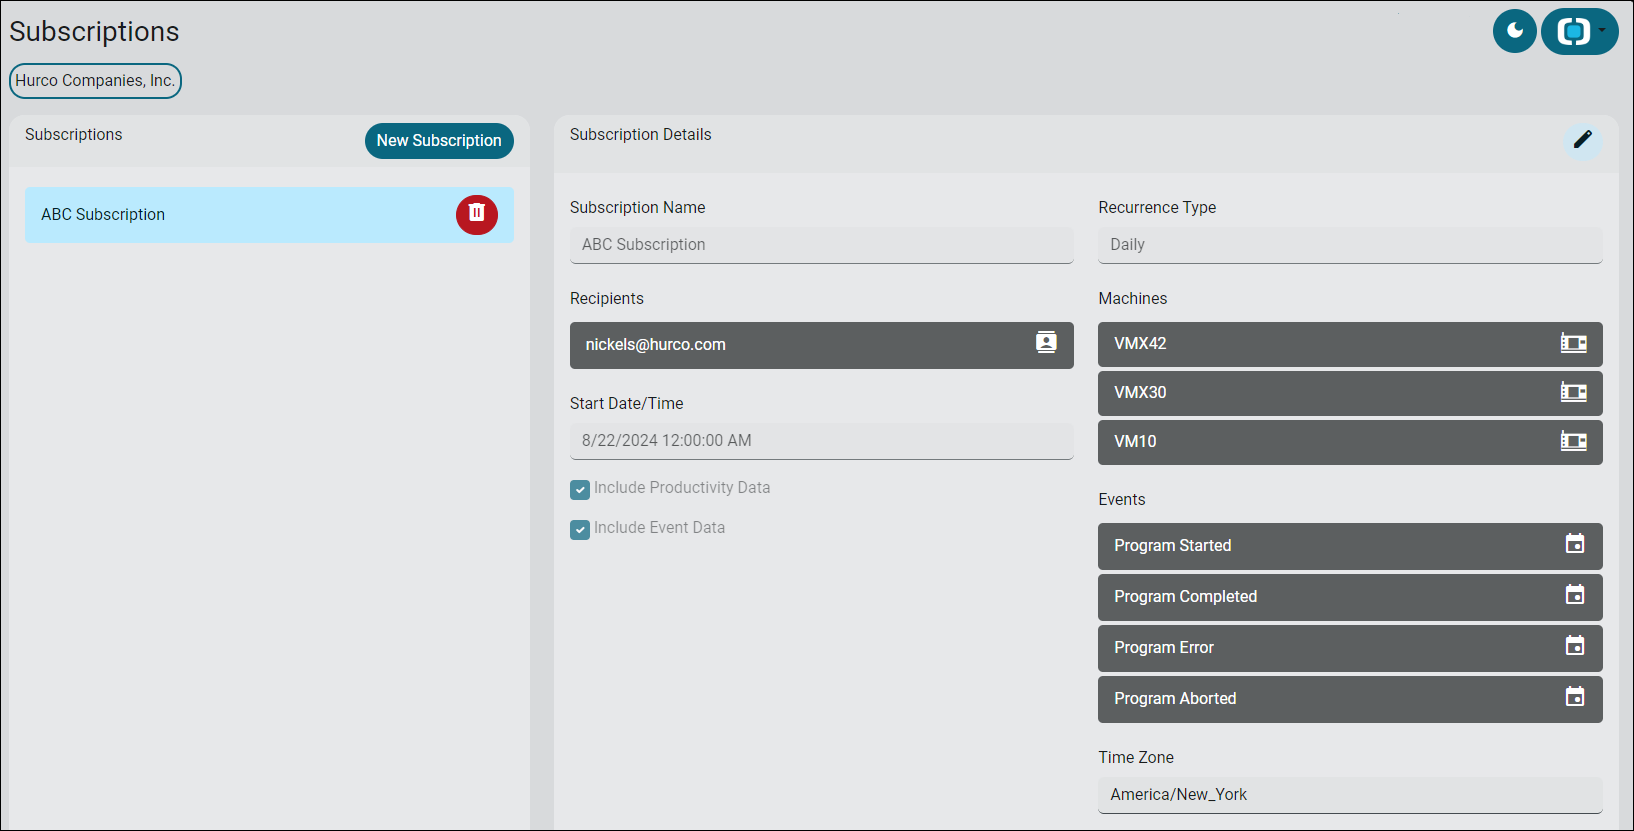
-
Click the New Subscription softkey in the upper left.
This displays the Subscription dialog. It is a three-step dialog; all steps must be completed to create the new subscription.

-
Enter a unique, identifying name in the Subscription Name field.
-
Select either or both of the Include machine event data? and Include machine productivity data? checkboxes to include the desired data in the subscription.
-
Click the Next softkey to proceed to Step 2.
-
Click in the Include data from which machines in your shop? field to display a list of all available machines.
Select at least one machine to include in the subscription. Or repeat this process multiple times to include two or more machines. Each displays in a separate block following selection.

|
|
Rather than individually select the machines to include, the Include data from whole shop? box allows the selection of all available machines for the subscription. This option can be selected only if no individual machines are selected above. |
-
Click the Next softkey to proceed to Step 3.
-
Click in the Recipients field and enter a valid email address.
-
Click the Add Email softkey to record the email.
When added properly, the email address displays in its own gray block. The email address is not added to the subscription (and the Create Subscription softkey will not be enabled) unless the owner/operator selects the Add Email softkey.
-
Repeat the preceding two steps, if necessary, to add multiple email addresses to the subscription request.
-
Select a value in the How often do you want to receive this notification? field.
|
|
Only subscriptions including event data offer the “Immediate” option in the How often do you want to receive this notification? list. |
-
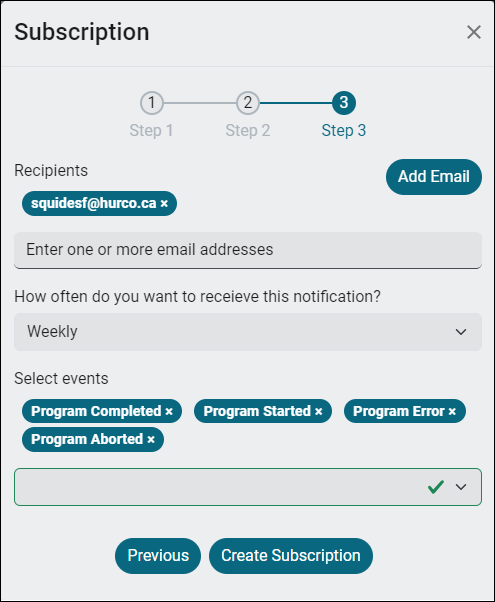
If the subscription is to include event data, display the Select events list and select at least one event.
Only event information of the selected type(s) is included in the subscription. Each event displays in its own block when selected. The subscription illustrated below, for example, will include only event data about programs being started, completed, aborted and those that have produced an error.
-
If necessary to select multiple events for the subscription, repeat the steps above until each necessary event is selected.
-
Click the Create Subscription softkey to establish the new subscription.
A confirmation message displays briefly in the lower right indicating that the subscription has been successfully created. The new subscription displays in the Subscriptions list following a short delay.
Changing or Deleting an Existing Subscription
Follow these steps to change or delete an existing subscription:
-
Select Subscriptions in the sidebar menu.
The Subscriptions screen displays the list of active subscriptions on the left and detail of the currently selected subscription on the right.
-
To modify a listed subscription, select its
 softkey.
This displays the Subscription dialog for this subscription.
-
Use the Previous and Next softkeys at the bottom of the dialog to step through the subscription details and edit where necessary.
-
After completing the changes, proceed to Step 3 and select the Update Subscription softkey.
A confirmation message displays briefly in the lower right indicating that the changes to the subscription have been successfully saved.
-
Or, if deleting a listed subscription, select its
 softkey.
This displays a confirmation message indicating that the owner/operator will no longer receive reports from this subscription if confirmed.
-
To confirm and proceed with deletion, select the Delete softkey.
ESF Subscriptions Example Emails
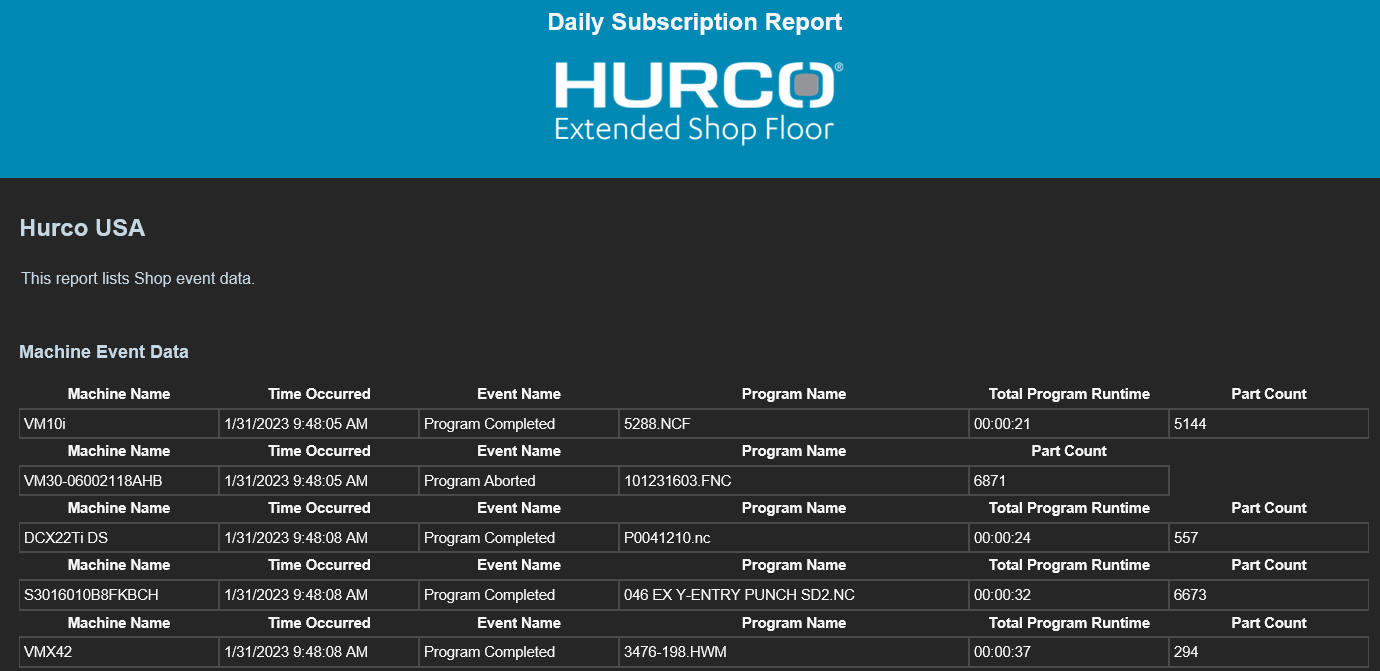
Following are examples of the productivity- and event-based emails generated by ESF Subscriptions:
Productivity-Based Subscription Email

Event-Based Subscription Email
|
|
Maintaining Program Packages
Program packages provide owners/operators a means within ESF to create a container encapsulating a program with all its related notes and supporting files. In most cases the program itself will already exist and can be designated as part of the program package. However, the name of a new program (not the program code itself) can also be established within a program package when necessary.
-
Select the Program Packages option in the sidebar menu.
This displays the Program Packages screen with all existing program packages for the current shop listed.
-
Select the Create New softkey.
This displays the Program Package dialog.
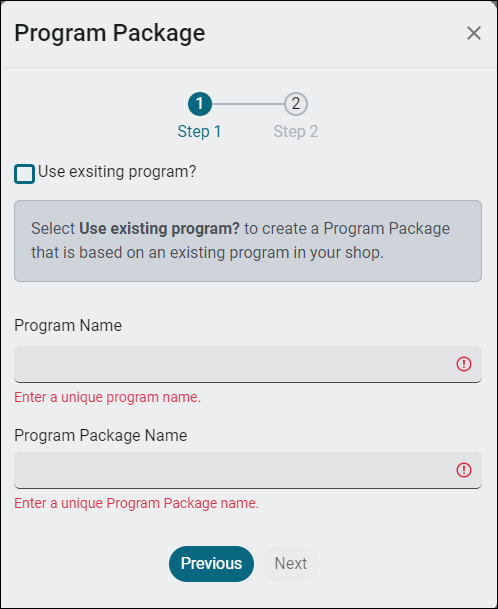
-
If basing the program package on an existing program used in this shop, select the Use existing program? checkbox.
This changes the Program Name field below to a search field labeled Select a program.
-
If using an existing program, enter a few characters of the program name in the Select a program field until the desired matching program displays in a list below the field. Select the desired program.
-
If creating a new program name, make sure the Use existing program? box is unchecked and enter the unique program name in the Program Name field.
This populates the Program Package Name field below with the same name.
|
|
ESF does not include a means of entering actual program code. If a new program name is entered here, only the matching program name will be found in WinMax (not the program code that goes with it). |
-
If the name displayed in the Program Package Name field is not desired, click in the field and make the necessary changes. Or retain the default program package name.
-
Select the Next softkey to proceed.
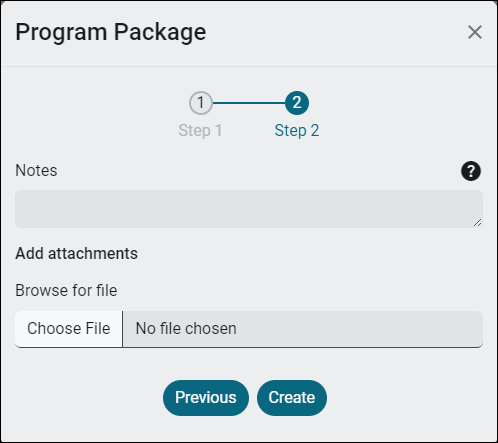
-
Enter any applicable notes about the program purpose, tools required or other details in the Notes field.
-
Select Choose File to display the Open dialog and select a file to include in the program package (if needed).
-
Select Open to save the attachment.
Each attachment displays in its own block above the Browse for file field.
|
|
The preceding steps can be repeated as necessary to attach multiple files. |
-
Select the Create softkey to save the program package.
Maintaining Shop Settings
Most Hurco customers can access a single shop via the Shop Settings option in the ESF sidebar menu. The Shops screen is used to maintain shop users, name and address details and to set up custom shifts, where applicable.
-
Select the Shop Settings option in the sidebar menu. This displays the Shop Settings screen with shop information for the current login.
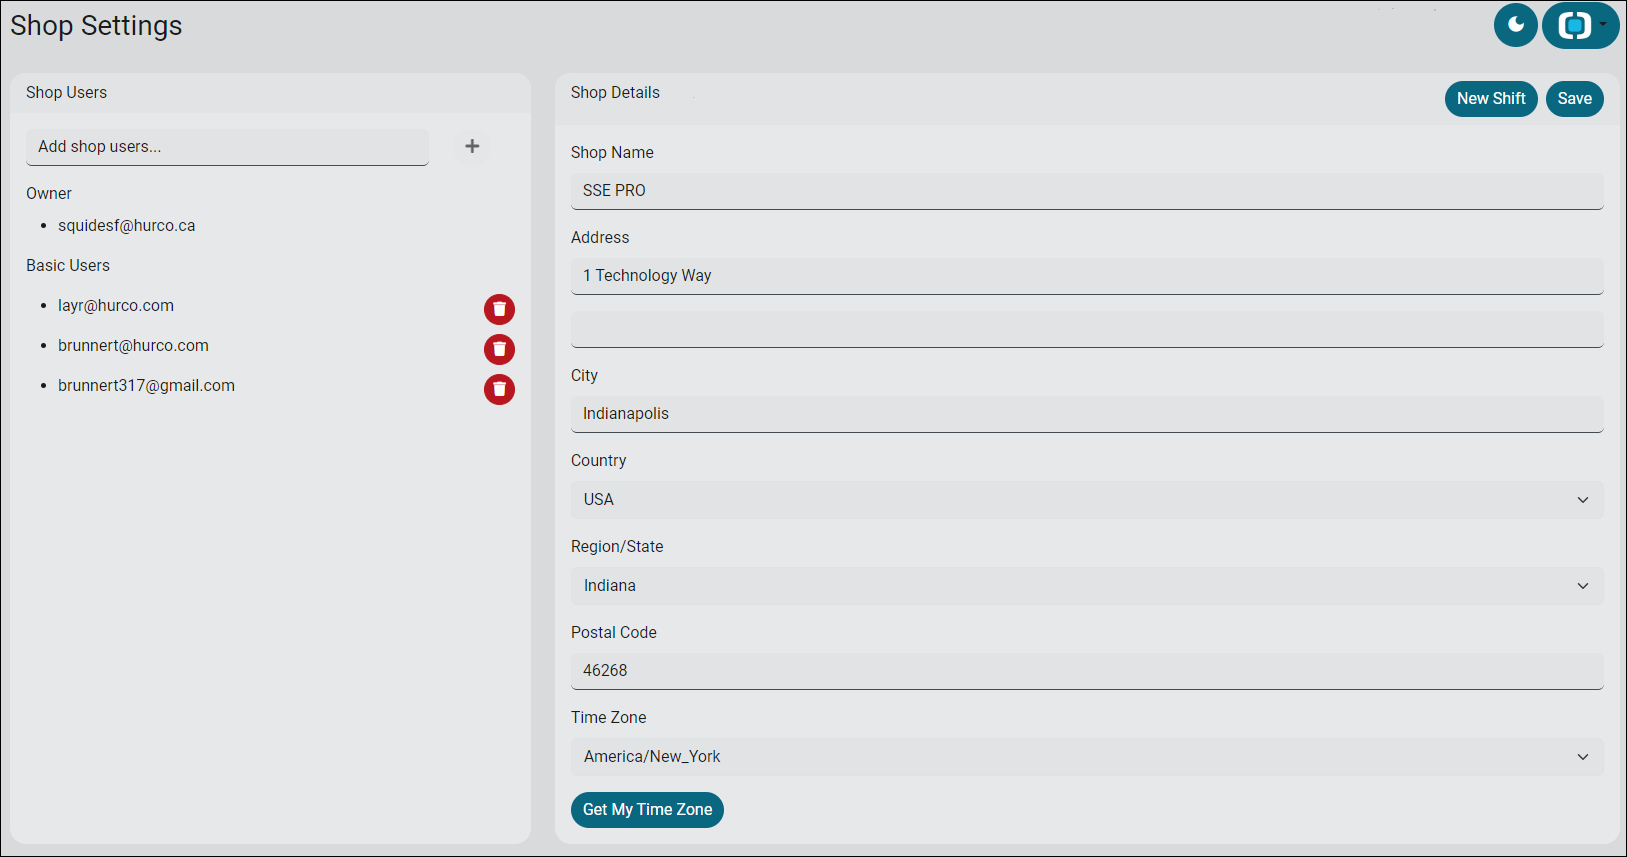
-
Add shop users, if desired, by entering valid email addresses (one at a time) in the Add shop users... field and clicking the
 softkey after each.
 -
Enter or modify the shop name and address information under Shop Details.
-
Select the applicable zone from the list in the Time Zone field or click the Get My Time Zone softkey to automatically derive the correct time zone for the address above.
-
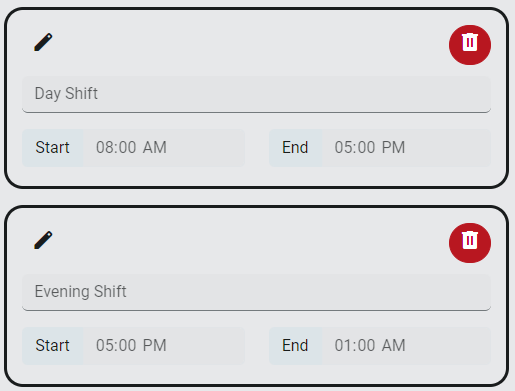
If the shop uses different shifts, select the New Shift softkey in the upper right.
-
Enter a name for the shift and enter shift start and end times in each respective field.
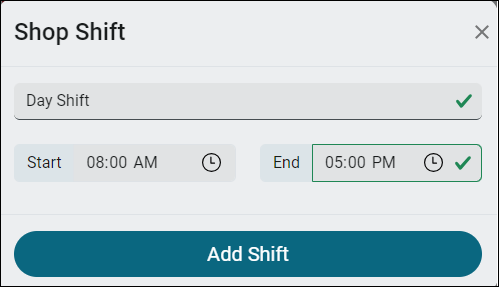
-
Click the Add Shift softkey at the bottom of the dialog to retain the new shift parameters. The shift displays to the right of the Shop Details information.
-
Repeat the steps above for any additional shifts.
-
Select the Save softkey in the upper right to save all changes to shop information.
