Tool Change Optimization
Tool Change Optimization reduces the number of tool changes in Conversational programs. In typical Conversational program execution, each data block is completed (roughing and finishing) before the program moves to the next data block. With Tool Change Optimization, operations are completed sequentially by tool; for example, the program completes all operations that use tool 1 before moving to the operations that use tool 2, and so on.
For example:
-
Without Tool Change Optimization, each frame in the pattern is rough cut and finish cut before moving to the next frame in the pattern. Sequence of tool changes: 1, 2, 1, 2, 1, 2. Total number of tool changes = 5.
-
With Tool Change Optimization enabled, all three frames are rough cut, then all are finish cut. Sequence of tool changes:1, 2. Total number of tool changes = 1.
More Information Online
For more information about Hurco's Tool Change Optimization option, visit the How to Use Tool Change Optimization - Hurco CNC Control Demo video demonstration on YouTube.com.
Using Tool Change Optimization
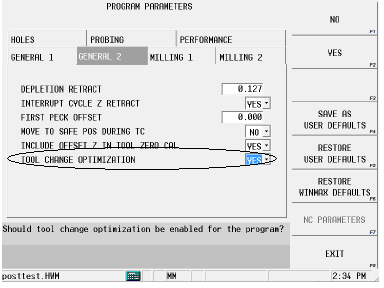
To use Tool Change Optimization, the Tool Change Optimization parameter must be set to YES (default is Yes). This parameter is found on the General 2 tab in Program Parameters:
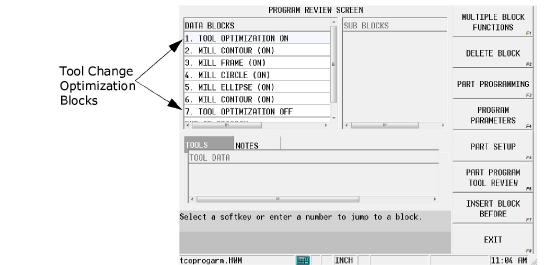
In addition, the Tool Change Optimization On block must be inserted ahead of the program blocks to which it applies. Both the parameter and the data block are necessary to activate Tool Change Optimization. The Tool Change Optimization Off block is inserted after the last block in which tool optimization is to occur. This allows flexibility in using Tool Change optimization on select blocks while maintaining normal tool change sequence in other blocks of the program.
|
|
With Tool Change Optimization on, a data block should not be dependent on the finishing pass of the preceding block to clear out stock (material) prior to that data block. With Tool Change Optimization, the finishing pass has not yet run (because all roughing operations are completed first), and therefore the finish material is not yet removed. |

To use the Tool Change Optimization On and Off blocks:
-
From a New Block screen, select the Miscellaneous softkey.
-
Select the More softkey twice.
-
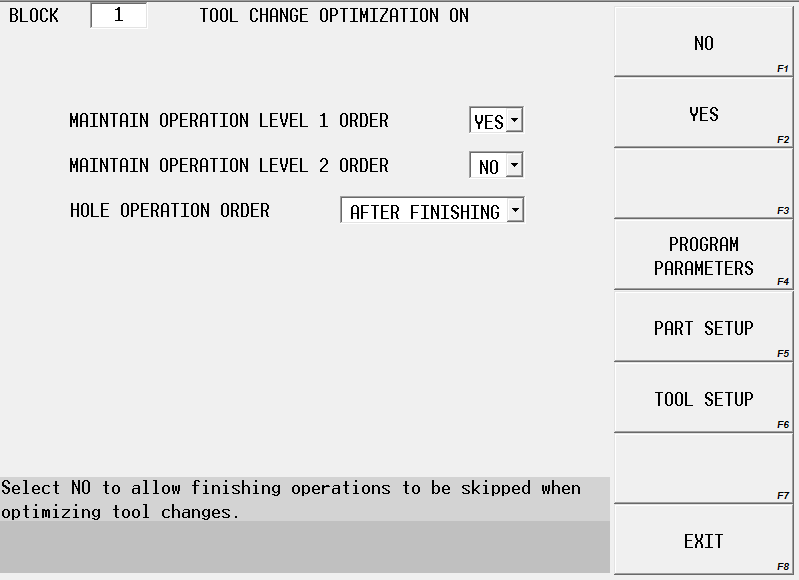
Select the Tool Optimize On softkey. The block opens:
-
Set the operations that will have tool changes optimized:
-
Maintain Operation Level 1 Order—when set to Yes, all Level 1 operations (typically these are the roughing operations) are performed in block sequence, including any specified tool changes. When set to No, all Level 1 operations are performed in tool change sequence. Default is No.
-
Maintain Operation Level 2 Order—when set to Yes, all Level 2 operations (typically these are the finishing operations) are performed in block sequence, including any specified tool changes. When set to No, all Level 2 operations are performed in tool change sequence. Default is No.
-
Hole Operation Order—determines the order in which hole operations are performed in a program relative to all other operations in the program. Set all hole operations to be performed before or after mill finishing operations or before mill roughing operations.
-
|
|
For Holes, the first hole operation is treated as a Level 1 operation and will be executed when other Level 1 operations are executed, based on the Maintain Operation order. The other hole operations will always follow the first hole operation. If the hole operation should not be started until a previous block has been finished, then be sure to disable Tool Change Optimization prior to hole operation. |

|
|
The Maintain Operation Level 2 Order parameter does not apply to holes operations. |

-
Select the Tool Optimize Off softkey. The Tool Change Optimization Off block is used to turn off the Tool Change Optimization feature for a block or group of blocks within a program, after the Tool Change Optimization On block has been used at an earlier point in the program.
Example
In the sample screen above, tool change optimization occurs for blocks 2-6. The sequence with Tool Change Optimization parameter set to Yes and the Tool Optimization On block Maintain Operation Level 1 Order and Maintain Operation Level 2 Order set to No is shown below:
|
Block
1 2 3 4 5 6 7 |
Type
TCO On Mill Contour Mill Frame Mill Circle Mill Ellipse Mill Contour TCO Off |
Rough Tool
1 1 2 1 1
|
Finish Tool
3 3 4 3 3
|
Tool Change Sequence Block 2 (Tool 1) Block 3 (Tool 1) Block 5 (Tool 1) Block 6 (Tool 1) Block 4 (Tool 2) Block 2 (Tool 3) Block 3 (Tool 3) Block 5 (Tool 3) Block 6 (Tool 3) Block 4 (Tool 4)
Tool Changes = 3 |
Note in the sequence that all roughing blocks that use the first roughing tool (Tool 1) are executed in block sequence, before switching to the next roughing tool (Tool 2). After all roughing operations are completed, all finishing operations that use the first finishing tool (Tool 3) are executed in block sequence, followed by the block that uses the next finishing tool (Tool 4). This requires 3 tool changes.
|
|
If a finish tool is not specified in a milling block, the tool listed in the Roughing tab is considered a finish tool and will be grouped with the other finish tools. |

|
|
If a hole block is within a group of blocks that use Tool Change Optimization, the hole operations are completed as a group. In addition, the first hole operation’s tool is grouped with the tools of the other blocks and is completed in the sequence specified by the Maintain Roughing Sequence. |

|
|
Partial program runs are not allowed with Tool Optimization. |

When Tool change Optimization is not used (no Tool Optimization On block), the sequence of tool changes looks like this:
|
Block
1 2 3 4 5 |
Type
Mill Contour Mill Frame Mill Circle Mill Ellipse Mill Contour |
Rough Tool
1 1 2 1 1 |
Finish Tool
3 3 4 3 3 |
Tool Change Sequence Block 1 (Tool 1) Block 1 (Tool 3) Block 2 (Tool 1) Block 2 (Tool 3) Block 3 (Tool 2) Block 3 (Tool 4) Block 4 (Tool 1) Block 4 (Tool 3) Block 5 (Tool 1) Block 5 (Tool 3)
Tool Changes = 9 |
Note that tool changes occur in block order, resulting in 9 tool changes.
Tool Change Review
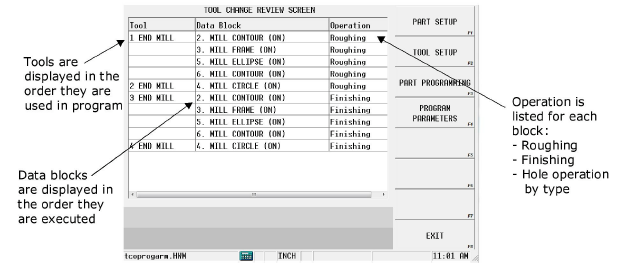
Tool changes are reviewed on the Tool Change Review Screen, accessed with the Tool Change Review softkey in the Part Program Tool Review menu. Tools are displayed in the order they are used in the program. All tool changes in a part program are displayed, even if the Tool Change Optimization feature is not used.
|
|
The Tool Change Review Screen is also accessible by pressing the alt and Review keys on the console keypad simultaneously while a conversational program is active. |

Jump to the data block from this screen in one of the following ways:
-
Select the block in the list and press the Enter console key.
-
Select the block in the list and select the Part Programming softkey.
-
Double-click on the block in the list.